
David E. Johnson
It takes years and years for nature and its elements—dirt, rock, water, and sand—to smooth a rock’s surface. With a machine called a rock tumbler, you can get those same results (or better) in considerably less time. The tumbling process is the simplest and least expensive of the lapidary arts and is probably the most commonly used one. Comparatively, it requires a minimum of equipment and minimal skills. You start with some broken rocks, known as tumbling rough and place them into a tumbling barrel with some abrasive grit and water. The barrel is then rotated over and over 24 hours a day on a rock tumbler that is powered by a small motor.
All of this tumbling wears the rough edges off of the stones and produces smooth, rounded pebbles. These are then run through a polishing step to produce shiny rocks. Tumbling rocks is easy and fun.
Before You Begin
Most rock tumblers require a little maintenance to work smoothly. Be sure that the tumbler’s bearings are in place and both shafts turn freely. Oil the bearings with one drop of household oil each. Be careful not to get any oil on the belt or where it will get on the soft rubber barrel. Oiled belts slip and sticky barrels are no fun at all. Oil the bearings after every three weeks or as advised in the instructions of your tumbling kit.
Select a spot for your rock tumbler that is out of the way, like in a basement or garage. The tumbling process takes weeks and the tumbler will make a bit of noise. Tumblers with a rubber barrel minimize the noise to some extent. You need more than one wall between your bed and the tumbler if you want to get any sleep. If you are using a steel barrel, you will need more than that!
Do not forget about your neighbors either. Simply putting it in the garage may help you sleep, but it may not ingratiate you with your neighbors.
If you do not have a secluded room or basement, consider making a container for it. A cardboard box lined with Styrofoam, or covered with an old blanket, will reduce the sound considerably.
Choose a surface that is level and sturdy. You may want to put an old towel or rug under the tumbler to protect the surface.
It will help to keep a written record of the process. Keep track of the types of stones tumbled, tumbling times, polishes used and things you learn.
Step 1: Coarse Grind
Inspect the rocks that you are about to tumble. They can be pre-ground or pre-formed as needed or desired before being tumbled. Make sure that they are the same hardness and of various sizes because harder stones will scratch softer ones. Measuring the hardness of your rocks may seem daunting, but it can be accomplished with simple tools. A pocketknife is about 6 to 6.5 in hardness; a file is closer to seven. You can also assemble a set of stones of known value for your testing. See the Mohs Scale of Mineral Hardness page in the Archive section which provides details of how to determine the hardness of rocks using simple tools.
Materials of the same hardness will not scratch each other. Therefore, if you want to tumble some agates, use a piece of agate to scratch the other stones you intend to tumble with them. It should not scratch any of them, nor should it show any wear. If suddenly it wears away on a stone, that piece is much harder and should not be included in your tumbler.
Not all stones will take a polish, just the harder ones. A simple field test will save you from bringing home a lot of useless rock. Try scratching them with a pocketknife. If you cannot scratch the specimen, it will probably take a polish. Some rock has tiny pieces of softer stone in it that will never polish like the rest o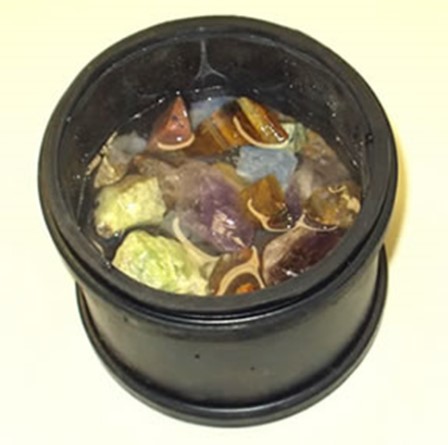 f the stone.
The rough needs to range from not more than half the diameter of your barrel, to about 1/10th the size of the largest stone. Some tumblers say that if your largest stones are three inches in diameter, there should be just as many two inch stones, one inch, one half and one quarter inch stones by volume (not numbers).
This is the reasoning behind the sizing: a) If all the pieces are the same size, there will be large gaps between them in the barrel as it turns. This reduces the effectiveness of the grit, as there is much less contact between the pieces if there are no smaller stones to fill in the gaps and help with the grinding. b) The pieces will not tumble as much in the barrel, they will tend to settle into a regular rise and fall routine which will cause certain edges to be in constant contact with the inside of the barrel wall. Eventually “flats” will form, wherein one side of the piece will be the same shape as the inner curve of the barrel and the rest of the stone will be virtually unchanged.
Remove any rocks that are cracked, have deep voids or have extremely irregular shapes. These should be discarded, broken or ground out. Cracks often retain grit and contaminate the next step. If all the sizes you need are not readily available, simply use a hammer to create them. When breaking up the stones, always wear protective goggles and wrap the pieces up in leather or towels before striking them with a hammer If you intend to work with stones the size of melons, you had better be prepared to gather a lot of filler to help grind them down! All rocks must be thoroughly cleaned before starting the first tumbling step.
If you are tumbling rounded beach rocks or rocks that have been pre-tumbled and are satisfied with the shape of the rocks, you may skip the coarse grind step and go straight to the finer grind. But if your rocks are broken, have jagged edges, or you would like them to be more rounded, put them through the coarse grind first.
The barrel must always be at least 1/2 full for the tumbler to operate properly. Typically, barrels are filled 2/3 to 3/4 full with stones. But don’t overload it! Barrels more than 3/4 full (including grit and water) may be too heavy for your tumbler’s motor and there might not be enough space inside for the rocks to tumble. A 3 pound tumbler has a motor designed to tumble a barrel that weighs up to 3 pounds, a 6 pound motor can handle a barrel or two barrels weighing 6 pounds total, etc. If you’re not sure if the barrel is too full, weigh it after adding the water.
Add the appropriate amount of 60-90 tumbler grit (which is usually silicon carbide) according to the tumbler’s instructions, or use the chart below. The hardness of the rocks does make a difference in either how much grit you use, how coarse the first grit is and how long the tumbler must run at each stage.
Add enough water to reach the bottom of the top layer of stones, but not so much that they are covered. You want to see some of the rock above the water. If you use hot water it will have a tendency to swell the rubber a bit and help seal the lid, which is more important if you are using a rotary tumbler.
Use a paper towel to clean the inside and outside rims of the barrel and the edges of the lid. Make sure the surfaces that will form the seal are clean and dry.
Place the lid on the barrel and seal the barrel. Put the barrel on the tumbler and start the motor.
Stick around for a few minutes to make sure the tumbler is running smoothly and the barrel isn’t leaking. If the barrel is leaking, stop the machine, remove the lid and re-clean the surfaces of the lid and barrel that must make the seal. Double-check that they are clean and dry. Replace the lid securely and proceed. Also, check the tumbler in a few hours again to make sure it’s still running smoothly. After this, it can probably be left unattended, but it’s not a bad idea to check up on it every day or so. You may find you need more water or grit, or that your rocks are grinding faster than you thought they would, etc. A few stones release gases that build up inside the barrel. It is possible for the gas to blow the top off the barrel if not released, but it is very uncommon.
If you have a double-barrel tumbler, you might need to load both barrels in order for the tumbler to function properly. 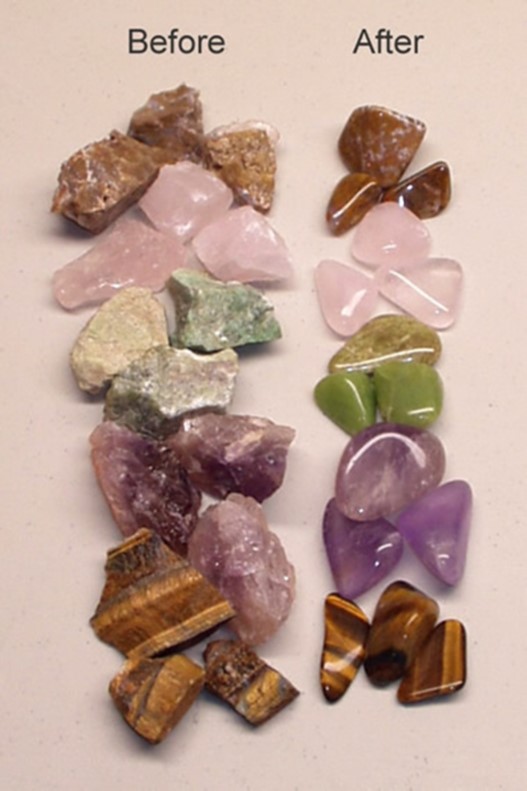 You can fill both barrels with batches of coarse grind of the same hardness so that they can be combined later on in a larger barrel or just into one smaller barrel if the rough grinds down a lot. Then you can have one barrel running a batch of finer grind while the other prepares more rough.
On average, let the tumbler run for 7 days, 24 hours a day. Softer rocks may not take that many days while harder rocks may take much longer. After inspecting the rocks and determining that the coarse grit has ground down the rough enough; it is time to remove the rocks.
DO NOT POUR THE MUD OR THE USED GRIT DOWN A DRAIN!
This stuff can clog your plumbing system. Instead, empty the barrel into a colander over a plastic bucket or a disposable container, like the bottom half of a milk jug or 2-liter bottle. Aluminum containers can potentially discolor some stones. Let the mud dry out and dispose of it. Rinse the rocks thoroughly with a weak stream of water. Wear safety glasses while rinsing to protect your eyes from a possible splash of muddy water.
Now that you have rinsed the rocks, take a good look at them.
Virtually all of the shaping is done in this first step. The other steps only smooth the rock, not shape it, so the shape you see now is what you will end up with if you continue to the fine grind. If you would prefer your rocks to be more rounded, you should repeat this step with fresh coarse grit until they are shaped to your liking. It may take a few re-runs, but the extra wait is worth the results. Don’t be in a rush! Quality takes time. If some of the batch is ready to go on to the next step, you should set aside those rocks to wait for the others to catch up.
If there are any rocks that have deep cracks or pits, these rocks should not be tumbled with the fine grind. Particles of the coarse grit will get trapped in these voids and contaminate the next step, scratching the other rocks. Break or hand grind these rocks and include them with your next batch of coarse grind. If the cracks or pits are very shallow, it might be possible to tumble them out, but this should only be done in the coarse grind. Don’t think that you can scrub the grit out; it’s next to impossible! Play it safe and save them for your next coarse batch.
If you are repeating the coarse grind, use fresh grit. The old grit can’t be reused because after many days it breaks down too much to be effective in shaping (yet will still effectively scratch rocks if it contaminates the fine grind). When loading the barrel, you might need to add new tumbling rough to bring the volume of the barrel to at least 1/2 full. If you don’t have more rough, you can use plastic pellets or ceramic media to bring the volume to 1/2 full.
If you are proceeding to the fine grind, first clean the rocks, barrel, and lid THOROUGHLY. Wash the barrel out completely using soap, not just water. This cannot be stressed enough. If you have grit or slurry left in the barrel or on the rocks when you proceed to the next step, you will contaminate the load and have to start over with the previous step. The particles of leftover grit will scratch the rocks during the next step.